My Area & Easy Launch Panel
My Area
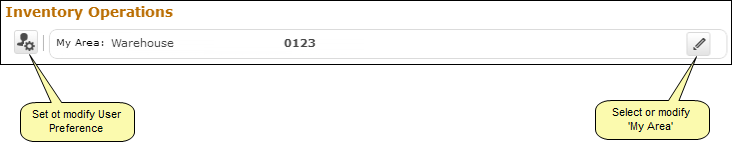
This section displays the Area of operation for the login user. The Area could be defined / modified by using the Edit icon provided. The documents shall be retrieved in the WorkSpace for processing based upon the defined Area. See Figure 3.
The different types of Areas that could be identified as My Area are:
· Work Center #
· Warehouse #
· Storage Location
· Area
Figure 3 My Area section
Select or Modify “My Area”
Click the “Edit Icon” ![]() to
set or modify My Area. See Figure 3a.
to
set or modify My Area. See Figure 3a.
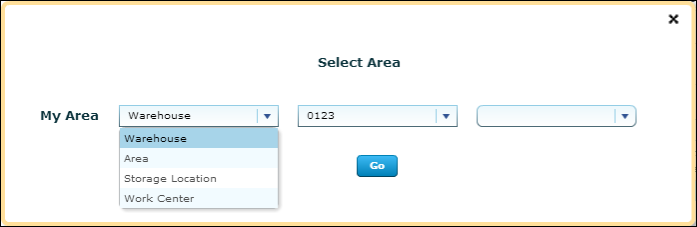
Figure 3a Pop-up screen to modify My Area
The pop-up screen has three drop downs. 1st drop down will be loaded with the following values: Work Center, Storage Location, Area and Warehouse depending upon user access rights to one or more Work Centers/Warehouse. It is mandatory to select a value.
The 2nd drop down will be loaded based on the value chosen in the 1st drop down. For example, if the 1st drop down is selected as “Warehouse”, then the list of Warehouses mapped to the login user will be loaded in the 2nd drop down and user can select a particular warehouse as the Area of operation. In the event where the user is mapped to more than one warehouses, a blank value will also be loaded and if user leaves the 2nd drop down as blank, information pertaining to all the warehouses will be displayed in the WorkSpace. The 3rd drop down will be loaded based on the value chosen in the 2nd drop down. For example, if Storage Location is selected in the 1st drop down then the 2nd one will be loaded with corresponding storage locations upon selection of a particular storage location the 3rd drop down will be loaded with the associated warehouses. Refer to the table below for more details.
1st Drop Down |
2nd Drop Down |
3rd Drop Down |
Work Center |
Loaded with the list of Work Centers mapped to login user |
Loaded with the list of Warehouse mapped to the Work Center chosen in 2nd drop down. |
Storage Location |
Loaded with the list of Storage Location mapped to login user, derived through Warehouse – Storage Location mapping |
Loaded with the list of Warehouse mapped to the Storage Location chosen in 2nd drop down. |
Area |
Loaded with the list of Area identified for the warehouses mapped to the login user. |
Loaded with the list of Warehouse mapped to the Area chosen in 2nd drop down. |
Warehouse |
Loaded with the list of Warehouse mapped to the login user |
Loaded with the list of Zones identified for the Warehouse chosen in 2nd drop down. Note: Zone information is only used in the Inventory Management & Alerts tab of the WorkSpace |
Note: Values chosen for “My Area” determines the details that will be displayed in the WorkSpace. If “My Area” is not defined for a User and Role combination, then a text “Please select My Area” in red will be displayed in the My Area section.
Easy Launch
This section facilitates launch of various application screens for creation or modification of receipt. With the radio button selected as ‘Create’, user can enter a Purchase Order, Repair Order, Loan Order, Rental Order or a Stock Transfer Issue and press the “Go” button to create respective receipts. With the radio button selected as ‘Edit / View’, user can enter a Goods Inward (Regular Purchase or Repair Receipt or Customer Goods Receipt), Loan / Rental Receipt or Stock Transfer Receipt and press the “Go” button to modify or view the respective receipt. Depending upon the Document # entered, “Go” button will launch respective receiving screens to facilitate receipt creation or modification. See Figure 4.

Figure 4 Identifies the Easy Launch section
To proceed carry out the following:
Go to "Inventory Operations" section.
Go to "Inventory Management & Alerts" section.
